Master classes showing how to draw a pencil in stages Smesharikov
About how to draw in pencil step by stepSmesharikov, this article will tell. Here, beginning artists will get acquainted with detailed master classes. And the problem of "how to draw a pencil in stages Smesharikov" will be solved.

Master-class "Draw Krosha"
If a beginner artist does not know how to drawpencil step by step Smesharikov, he should carefully consider the scheme. Repeating the actions displayed in the master class, even the child will achieve a remarkable result.
All Smeshariki begin to be depicted from the fact that they draw a circle.
It should be divided by auxiliary lines into four parts.
The concentric upper corners have ovals. They almost touch the vertical. These are the eyes. Inside, they need to draw black circles - pupils. Eyebrows are represented above the eyes. These are arcs that can be placed at different heights.
Between the eyes draw an oval. He touches the horizontal auxiliary with the underside. It will be the nose of the nose.
Under the horizontal auxiliary draw an arc-smile.

Two teeth are placed beneath it. They are of different sizes. It is thus to arrange the teeth so that the vertical auxiliary passes between them.
The ears are attached to the top of the head. The legs have the form of two semi-ovals.
Now it is necessary to draw the upper paws, and the rabbit Krosh is ready.
Master-class "Draw Barash"
Pictures with the heroes of this cute cartoonuse for making postcards, decorating wallpaper in the children's room, apparel apparel or as a jacquard pattern for knitwear. Therefore, the question of how to draw a pencil step by step Smesharikov, is relevant not only for the child.
To depict Barash is also quite simple. Work begins also with the outline of the circle and the cross-shaped auxiliary lines.

You can draw eyes to this hero as round asand in Krosh. But there is another option - try to make them a different form. The crooks are straight. A nose is close to the triangle, the obtuse angle of which is directed downward. Position the nozzle with a base on the horizontal auxiliary.
Around the circle draw arcs, which will imitate the curly skin of the character.
Dividing the upper quadrant of the circle in three parts mentally, in the lower third represent the ears of the animal.
In the upper third of the quarters, the horns curled into the "shell" are drawn.
The legs of the Barash end with hoofs. It remains only to paint the character, and the cool drawing is ready.
Master-class "Drawing the Sow-Up"
Knowing how to draw Smesharikov in stages, you canit is interesting to arrange lockers in a kindergarten or make charming stickers for children's furniture in the house. Therefore, it is worth considering the instruction on the image of Sowon.
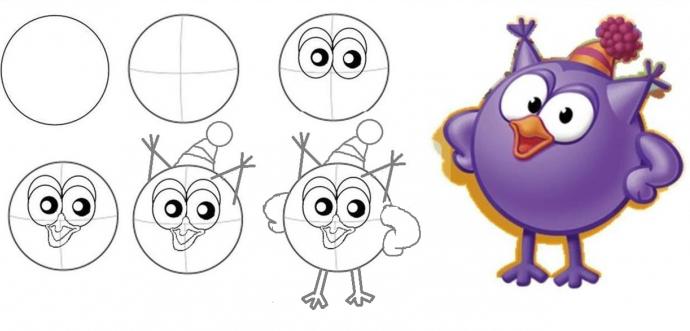
This master class begins with the same actions,as the previous ones: a circle, a cruciform auxiliary, ovals of the eyes, pupils. Inside the black circles, you can put small white dots - gleams in the pupils. Above the eyes, they draw arcs that will represent the birds' eyelids.
Between the eyes draw a beak. It coincides in the upper part with the outlines of the contours of the eyes.
In the upper quadruplets of the main circle draw triangular ears with brushes. On the head you can draw a hat with a pompon.
It is interesting that instead of the wings Sowinier you can draw hand-paws. But her legs are like sticks, at the end of which there are three straight fingers.
Master-class "Drawing Pandi"
This character is probably the easiestImages. After all, he does not have curly skins, ornate horns, beaks. But solving the question of how to draw Smesharikov pencil, do not forget about it.

An additional action to the algorithms already considered above will be the image of a closed curve around the eyes. This area is painted in black.
Now for a beginner artist it will not be difficult to draw any character from the cartoon about Smesharikov.
</ p>