Manishka with knitting needles: sketches and description for beginners, photo
With the onset of the cold season we are activelywe begin to be warmed. We prepare warm clothes for ourselves, our loved ones and, of course, children. At any of us in a wardrobe there are warm jackets, sweaters, cardigans, headdresses, mittens, socks, scarves. And, probably, everyone heard about such a warm thing as a shirt-front. It looks like a round scarf, a snap-on collar and a breastplate at the same time.

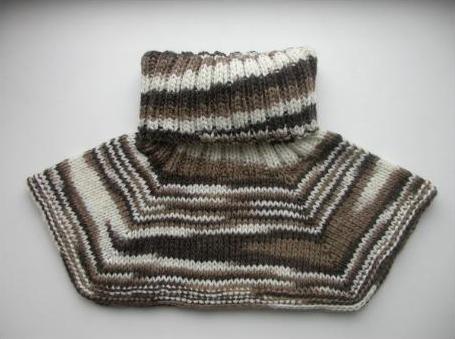
Manishka is a universal thing
She at the same time looks like a scarf and a warm collar. Very practical, comfortable and comfortable to wear for all generations. Manishka is convenient to put on, take off, so if your baby does not like the process of dressing and undressing in the cool season, tie him with a manicure!
If you are not a fan of warm scarves, which oftenopen in the wind and can be very cumbersome, then you will come in handy for you. Manishka knitting needles (charts and description for beginners you can find in this article) is easy to manufacture. We present to your attention the very simple options for knitting this circular scarf.
Bind the front flap yourself
Believe me, you will not have much difficulty creatingyour own masterpiece, this does not require much experience in knitting. You can easily make such a breastplate for yourself, your child, your husband. With the onset of cold weather and favorite New Year's holidays, this convenient circular scarf will suit you as a gift for your loved ones or friends. Everyone knows that any thing created by hands heats, in a special way. Manishka knitting needles (diagrams and description for beginners, we will describe below) is knit quickly and easily.
Knitting needles
The number of knitting needles directly depends on the yarn, from which your scarf-snag will be made. By the way, on each package of yarn it is specified, and if you are a beginner, it will serve as an excellent help for you.
For crochet crochet, select round knitting needles. Thanks to this, you do not have to sew a scarf and then it will look much neater without a seam.

Yarn
Since we are going to knit thing for warmingin the cold season, yarn should be chosen thick, consisting of half of wool thread. For children, it is better to choose a specially made baby yarn, it includes natural hypoallergenic fibers, which is very important for children's things.
Excellent yarn from acrylic thread -from it you will get a soft and pleasant product. Manishka knitting needles, charts and a description for beginners which we will provide further in the article, be sure to please your baby.
Broom sizes
So, with knitting needles and yarn wehave decided. Now you need to figure out the size of your future bib. On how many loops you will type initially, the size of the shirtman depends. If we are going to knit such a scarf-snag for a baby, who is only 1 year old, then you need to type 72 loops. For a two-year-old baby, it is required to initially increase by 8 loops. And so on, by age. The total number of loops should always be a multiple of 4, do not forget about it.
Children's shirt-front: a diagram, description for beginners

We bring to your attention quite easya way of knitting a circular scarf for children on round spokes. It is necessary for him to have 5 spokes. Once the desired number of loops is typed, start knitting according to the recommended pattern:
- Tie the elastic band 2 x 2 (alternating 2 face loops and 2 purl), about 15 cm.
- As we knit the product round, it is difficult for us to understand where the beginning and the end are in it, so it is necessary to remember them or mark them.
- After you have fastened the first loop, make a crochet (the nakid is an extra loop, making it simple, you just need to grasp the thread, forming an additional loop, and transfer it to the spoke).
- Tie all the loops on the spoke, do not forget to make the crochet before the last loop, tie it like a front one.
- Following points 3 and 4, tie the remaining three knitting needles.
- Bind the new series with the hinges.
- The third row is tied the same way as the first, adding nakidy.
- We add nakidy through each row, bringing the length of the shirt-front to about 8 cm.
- Several final rows are tied with the "rubber band" technique, as described in the beginning.
- Finish your knitting as follows: tie the last row, tying two loops at a time, while removing them from the spokes.
You got a knitted shirt with knitting needles! Diagrams and a description for beginners of how to decorate it, do not need, it all depends on your imagination.

The above method is universal. A special instruction on how to knit a baby shirtlet with knitting needles (scheme, description) for 1.5 years, 2 or for older children, is not needed. You can take as a basis the proposed above.
Another way
Manishka children's needles (diagram and description forbeginners are suggested in our article) will also work for you if you link it by the following simple method. For this kind of knitting you will need regular and circular knitting needles.

You know, in order to tie a shirt for a baby for 1.5 years, you need to collect 72 loops. This amount should be distributed into 4 spokes. As a result, on each of them you should have 18 loops each.
Determine the beginning of the series. The neck of the scarf, as a rule, should be tied with an elastic band that will not allow the product to stretch strongly in the toe. So, we sew with an elastic band 1 x 1 (alternate 1 face and 1 purl loops), about 8 cm. After the elastic band is ready, we sew the next 4 rows with the front loops.
The next step is to divide our knitting into four parts:
- 1 part - in front, which consists of 22 loops. We impose it: we alternate 2 facial and 8 purl loops.
- The second part is the right shoulder, which consists of 12 loops.
- The third part is the back, which also consists of 22 loops. We untangle the back, as before.
- Part 4 - left shoulder, consisting of 12 loops.
Continue to knit our bib, adding atThis is one loop on the two sides of the first and last loop of each part. Thus, you should get raglan. We add loops through each row. And in order not to form large holes during the addition of loops, you need to add them as follows: in the right hand, place the needle under the thread on the finger and grab it. Then we transfer this loop to the left needle and tie the front, behind the back wall.
As you can see, with the addition of loops the productExpand, and in order for you to be comfortable knitting, at this stage start using circular knitting needles. After your product is already knotted about 8 cm, stop adding hinges and close before and right shoulder. Continuing to knit the back, close the left shoulder.
We fix the backrest. You should get the product with the front and the underside. In each facial row on both sides, we loosen one loop, until there are 30-32 loops left on your spokes. We close all the hinges, the back is ready.
We decorate the shirt front
If the baby shirt is knitted with knitting needles,The scheme-description for the boy or girl looks the same. The only difference is in the color of the finished product. If you are going to tie a shirt for a boy, choose blue, blue, light green, beige, black. If it is intended for a girl, then choose bright and delicate shades of pink, red, yellow.
The finished product can be decorated with embroidery,pompons, laces, buttons, bows. The edges of the ready-made shirt-front can be tied with a crochet (columns without a crochet) at will or decorate to your taste. It all depends on who the baby shirt is for.

Spokes (diagrams and description, photos are available in the article)you can now easily link this simple and very convenient thing. In fact, there is nothing complicated here. The main thing is to have a desire, patience, and then everything will turn out for you.
</ p>