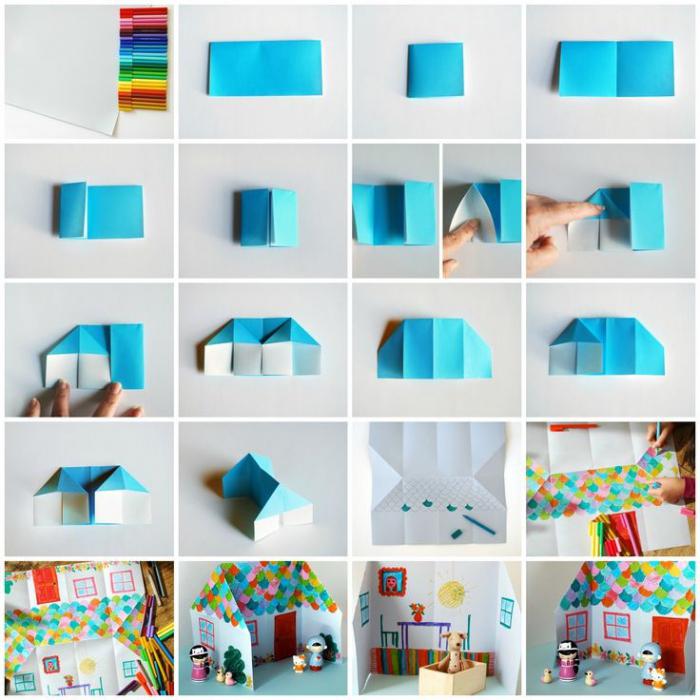
Easy origami for children and adults
It happens that the child has nothing to occupy. Try to teach him to fold light origami from paper. We hope that this will seriously interest your baby. In addition, such an exercise develops the fine motor skills of the hands, teaches patience, attentiveness, indirectly acquaints with the big world around. Children love to make something with their own hands. Yes, and adults, helping them, pleasantly distracted from ordinary affairs - so unnoticed and the evening will fly by!

Easy origami: make a boat of our childhood
- Let's fold the usual sheet in half.
- We bend the upper corners to the middle.
- The top layer of paper at the bottom rectangle is bent upwards.
- We will repeat on the other side.
- Fold these triangles inside and to the left, and to the right.
- We will repeat on the other side.
- Pull the middle of the boat in different directions to combine the corners.
- The lower triangle will bend upwards, we will repeat on the other side.
- Pull, bending the bottom part up.
- Straighten - the ship is ready!
As a result, the child is happy, and you remember the skills long forgotten, from childhood.
Do it yourself
The best gift is what's doneyourself! Easy origami of paper - as an option. Your gift is completely unique, it's an original thing made "specially for ...", and "hand-made" is now fashionable. Someone will say that donating a hand-made paper is not serious. But look at these paper flowers. They are not inferior to the present!
Valentines
You can show your personality here, surprising your loved ones with a beautiful valentine-origami in the form of a heart or a flower!
We fold the tulip in the style of origami

- Take a sheet of paper (square, for origami) and fold it horizontally.
- Let's fold it once again in half.
- Pull the top left corner, but only one layer of paper, then open and flatten.
- We turn it over.
- We add the "valley" (this is the origin of the fold line in origami).
- Open and flatten one more part of the workpiece, we got the basic form of "double triangle".
- Lower corners bend to the top, we repeat on the other side.
- Perelisten, we will repeat on the other side.
- We bend the corner so that we cross the diagonal, we repeat from the other side.
- We put the angle into the pocket, we will repeat from the other side.
- Inflate and bend the four petals.
The head of the tulip is ready!

Now we produce one of the variants of stems:
- Add the paper sheet (square) diagonally, and then expand it.
- To the planned line, we add the upper and lower corners.
- It turns out the basic form of "kite".
- Let's rotate 90 degrees.
- Two folds of the valley.
- Let's fold in half.
- Add the "valley" again.
- We pull out a small triangle - this is the stem of the tulip.
- The second half is a leaf of a tulip.
- We connect the head of the tulip with the stem.
- We got an easy origami - a flower of a tulip! As you can see, the process is not complicated.
Now you know how to make origami easy. To create amazing crafts, a minimum of time and materials is required. It remains to add that light origami is also a way to decorate a room (for example, a nursery)! Paper handicrafts are hung on threads - and this can be done almost anywhere in the apartment. Paper cranes, origami balls usually cling to chandeliers, and flowers from multi-colored origami paper can be placed on a table in decorative vases - it will be beautiful and original.
</ p>