How to make claws from paper?
The claws made of paper are quite simple, butthere are a total of three separate types of manufacturing claws made of paper. In general, this kind of needlework is called origami. This is an ancient art, with which you can make any figure of any size from the paper, and sometimes make it move (for example, you can make a frog from colored paper that will jump when pressed). So, let's move on to how to make claws from paper.
Method one: without glue and scissors
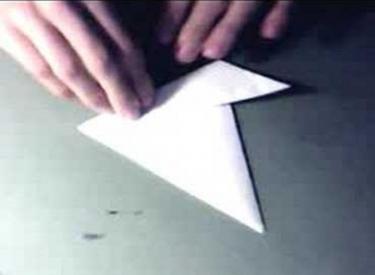
First, do not think that such claws immediatelyfall apart because they are not glued together! You just need to correctly wrap the ends of the paper inside the claw, then it will retain its shape and it will hold well on your fingers. To make it clearer how to make a claw of paper, the order of operations with a sheet is arranged in the form of sub-clauses that follow one after another in the same sequence in which they are indicated.
- Take a square sheet in such a way that its tips look up and down, that is, that a piece of paper is represented by a diamond.
- Make from a piece of paper, and when you doit, try on the finger, on which it is planned to clothe a claw. In other words, at this stage you are making the base of the claw, which is a cone, the base of which is your finger.
- Gently bend the protruding tips, fixing themand at the same time supporting the claw so that it does not lose its shape. If you do everything right, the claw will not fall apart and it will be good to sit on your finger.
By the way, this method is good for those who haveexperience of making such claws, since the first time few people can get them done properly, they need training. Interesting fact: in this way in America for the holiday of all the saints (Halloween) children make their claws on their fingers, decorating them (or just hanging them around their necks).
Method two: glue + scissors
This method is great for those whomakes claws for the first time or just does not understand how to make claws of paper without using glue and scissors. This method is distinguished by its unique simplicity: in ten to fifteen minutes of work you can make claws on all fingers. For this method, you need: sheets of paper, the number of which coincides with the number of planned claws, scissors (they must be sharp enough, so do not take those that "chew" paper) and a good quality glue (not those that smeared with thick layers or generally flow). So, let's begin.
- Fold a cone from the sheet of paper that will easily fit into your finger, but it will not fall off.
- The tips that protrude from the base should be carefully cut with scissors.
- Glue the claw so that all the glue is under the layer of paper, since it will stick and collect on itself fine dirt and dust, and this will spoil the general appearance of the claw.
- Do all of the above actions as many times as you want to have claws.
Tip: If you have a desire to paint claws, then wait for the glue to dry on them, because the paint "floats" where there will be a layer of glue.
Method three: without scissors, but with glue
Such claws are particularly fortified, sincethey are fastened not only with glue, but curved inwards with their tips. Before you make claws of paper, make sure that the glue is of good quality and will not ruin the work.
- Make a small cone out of the paper, try to put it on your finger.
- Glue the joints of the paper with glue.
- Fold the corners sticking out at the base and glue them so they do not interfere.
Tip: Do not wear the claws on your fingers until the glue dries completely, because when you begin to remove the claw from your finger, it deforms.
If you do everything right, then your clawswill be neat and will not fall off your fingers. If you have a desire to decorate the claws, you can paint them, wrap them in colored threads or braid the wire with beads. Choose any method you like how to make claws of paper, and get to work!
</ p>